
No Boundaries Combat Boots Won’t Break In? Here’s the Fix
Brand-new combat boots can feel like cardboard for the first few wears — stiff leather, tight toe boxes, and blisters waiting to happen. At No Boundaries, we build our boots for durability, but that also means the materials need time to mold to your foot.
If your new pair feels unbearably rigid after a week, you’re not stuck waiting months for relief. A few targeted techniques can speed up the process and get you to a comfortable fit in days, not weeks. This guide walks through the exact steps that work for our lug sole and wide combat boots, plus troubleshooting for common sticking points.

Why Combat Boots Take Longer to Break In Than Other Footwear
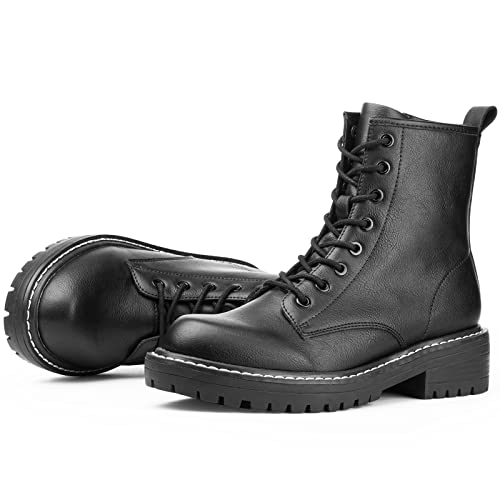
Combat boots use thicker leather and reinforced stitching compared to casual shoes, which means more initial stiffness. The toe cap, heel counter, and ankle collar all need repeated flexing before they soften.
No Boundaries models with lug soles also feature denser rubber that holds its shape longer — great for traction and wear resistance, but it adds another layer of firmness during the first few wears. Understanding this helps set realistic expectations: a well-made boot won’t feel like a sneaker on day one, and that’s by design.
The goal isn’t to make the boot *loose* — it’s to let the materials conform to your foot’s shape without creating pressure points. That distinction matters when choosing a break-in method.
Wear Them in Short Sessions with Thick Socks
Start by wearing your boots indoors for 20–30 minutes at a time with a pair of thick hiking or wool socks. Walk around your house, flex your ankles, and let the leather start bending where your foot naturally moves.
Increase the session length by 10 minutes each day. By the end of the first week, you should be able to wear them for a full hour without discomfort. This gradual approach avoids the blisters that come from trying to power through an eight-hour shift in unbroken boots.
If you notice rubbing at the heel or ankle, add a second pair of socks or a targeted blister pad for those sessions only. Once the boot softens, you’ll drop back to normal sock thickness.
Use Leather Conditioner to Speed Up Softening
A quality leather conditioner accelerates the break-in process by adding moisture to stiff panels. Apply a thin coat to the toe box, ankle collar, and any other areas that feel rigid — avoid soaking the leather, which can weaken stitching.
Let the conditioner absorb for 15 minutes, then wipe away the excess with a clean cloth. Wear the boots immediately afterward while the leather is still slightly pliable. The combination of conditioner and movement helps the material stretch and mold faster.
Repeat this every three to four days during the first two weeks. After that, condition monthly to maintain flexibility. Styles like the women’s lug sole wide combat boots benefit especially from this approach, since wider fits have more surface area that needs softening.
Target Stubborn Pressure Points with Heat
If one specific spot — usually the toe box or heel counter — refuses to give, focused heat can help. Put on thick socks, lace the boots snugly, and use a hairdryer on medium heat to warm the tight area for 30 seconds.
Flex your foot back and forth while the leather is warm, which encourages it to stretch in that exact spot. Let the boot cool completely before taking it off — this locks in the new shape. The technique works for both men’s combat boots and women’s models, though men’s boots often have thicker heel counters that need an extra round of heat.
Avoid high heat settings, which can dry out leather and damage adhesives. Medium warmth plus movement is enough to reshape without harming the boot’s structure.

When to Use a Boot Stretcher vs Manual Flexing
A two-way boot stretcher expands width and length simultaneously, which helps if your boots feel tight across the ball of your foot or in the toe box. Insert the stretcher, turn the handle until you feel moderate resistance, and leave it overnight.
Check the fit the next morning before adding more stretch — overdoing it can create a sloppy fit that defeats the purpose of a structured boot. Manual flexing — bending the boot back and forth with your hands — works better for softening the ankle collar and upper panels without changing the overall size.
For many wearers, manual methods plus conditioner are enough. Save the stretcher for genuinely too-tight boots, not just stiff ones. If you’re comparing lug sole vs wide combat boots fit, remember that wide models already account for extra room — stretching them further can make them unstable.
Getting the Fit Right Without the Wait
Breaking in combat boots doesn’t have to mean weeks of blisters and sore feet. Combining short wear sessions, targeted conditioning, and heat treatment on stubborn spots gets most boots to a comfortable fit within two weeks.
The key is patience with the process but urgency with problem areas — address hot spots immediately, and don’t push through pain hoping it’ll resolve itself. A boot that’s properly broken in should feel like an extension of your foot, supportive without being restrictive.
If you’ve tried these methods for three weeks and the boot still feels unworkable, revisit the fit itself. Sometimes what feels like a break-in issue is actually a sizing or width mismatch that no amount of conditioning will solve. For further options in construction and fit, ankle boots with different lacing systems can offer alternative approaches to securing the fit.
Common Questions About Breaking In Combat Boots
Most combat boots need 15 to 25 hours of active wear to reach full comfort. That typically translates to two to three weeks of regular use if you wear them a few hours per day.
Boots with thicker leather or reinforced toe caps can take up to four weeks. The timeline shortens if you combine wear time with conditioning and targeted stretching.
Soaking leather boots is risky and usually unnecessary. Water can weaken adhesives, promote mold, and cause uneven drying that creates new stiff spots.
If you need moisture, use a damp cloth on problem areas or a proper leather conditioner instead. These methods add flexibility without the structural risks of full immersion.
They should feel snug but not painful. Your toes need room to wiggle, and the heel should stay in place when you walk. Stiffness is normal; actual tightness that pinches or compresses your foot means you need a larger size.
Breaking in softens materials but doesn’t significantly change the boot’s length or width. If the fit is wrong from the start, no amount of break-in will fix it.
Thick socks during break-in are fine and even helpful — they cushion your foot while the leather softens. Once the boot is broken in, drop back to normal sock thickness.
Wearing perpetually thick socks after break-in can stretch the boot beyond its intended fit, making it loose and reducing ankle support. Use the extra padding as a temporary tool, not a permanent solution.
Slight variations in leather grain and stitching tension mean one boot sometimes breaks in faster. Focus your conditioning and heat treatment on the stiffer boot, and wear them together during short sessions to even out the process.
If the difference is extreme — one boot causes pain while the other feels perfect — inspect the stiff boot for defects like bunched lining or misaligned stitching. Manufacturing inconsistencies are rare but do happen.
Oils like mink oil or neatsfoot oil do soften leather, but they can darken the finish and make the material too supple for structured boots. A dedicated leather conditioner maintains the right balance of flexibility and support.
If you choose oil, test it on a hidden area first and apply sparingly. Too much oil weakens the leather’s ability to hold its shape, which defeats the purpose of a combat boot’s reinforced construction.